How to Create Assignments in Blackboard: A Step-by-Step Guide
Step-by-step guide to creating assignments in Blackboard, covering both Original and Ultra interfaces for smooth course management.

Short answer: To create assignments in Blackboard, navigate to your course's Control Panel, select the Assignments tool under Course Tools (Original) or go to the Course Content area (Ultra), then use the Create Assignment button to set titles, due dates, instructions, and grading options. Save and deploy the assignment to make it available to students for submission.
This article covers how to create assignments in Blackboard for both the Original and Ultra interfaces step-by-step. You will find clear instructions on locating, submitting, uploading, deleting, resubmitting, and unsubmission of assignments. It also includes troubleshooting tips and customization options to ensure your assignments fit your course needs and run smoothly.
Before you start: What you need to create assignments in Blackboard
Ensure you have instructor or course builder access to your Blackboard course. Without these permissions, you cannot create or manage assignments. Confirm your institution uses either Blackboard Original or Ultra interface; the steps and options vary between them. Decide on the assignment type ahead of time: file upload, online text submission, group assignment, or any other format your course requires.
Prepare clear assignment instructions that specify expectations and submission guidelines. If you use a grading rubric, have it ready to attach during assignment setup. Set a due date and consider any availability restrictions. Know your desired student submission settings, such as allowing multiple attempts or anonymous grading, as well as grading options like points or letter grades.
Having all these elements ready avoids interruptions and streamlines the creation process. This preparation ensures you focus on setup rather than searching for materials or permissions.
- Confirm you have instructor or course builder access to the Blackboard course. You should see course management options once logged in.
- Identify whether your course uses Blackboard Original or Ultra interface. The course homepage or settings menu will indicate this.
- Decide the assignment type you want to create (file upload, online text, group assignment, etc.).
- Prepare assignment instructions, grading rubric files, and set the due date.
- Know your preferred student submission settings and grading options before starting.
- Instructor or course builder permissions confirmed
- Interface type (Original or Ultra) identified
- Assignment type decided
- Instructions, rubric, and due date prepared
- Submission and grading settings planned
How to create assignments in Blackboard Original
- Go to the course content area where you want the assignment. You should see the content folder or module listed on the main course page.
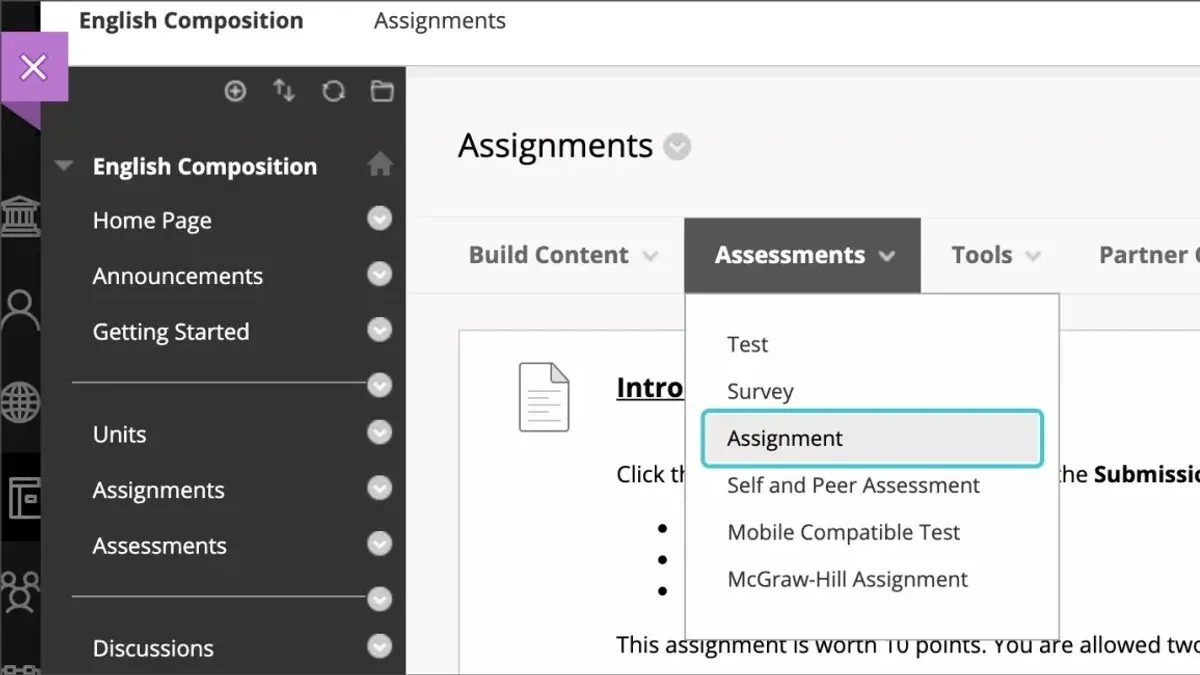
- Click on Assessments in the action bar, then select Assignment from the dropdown menu. A new assignment creation page will open.
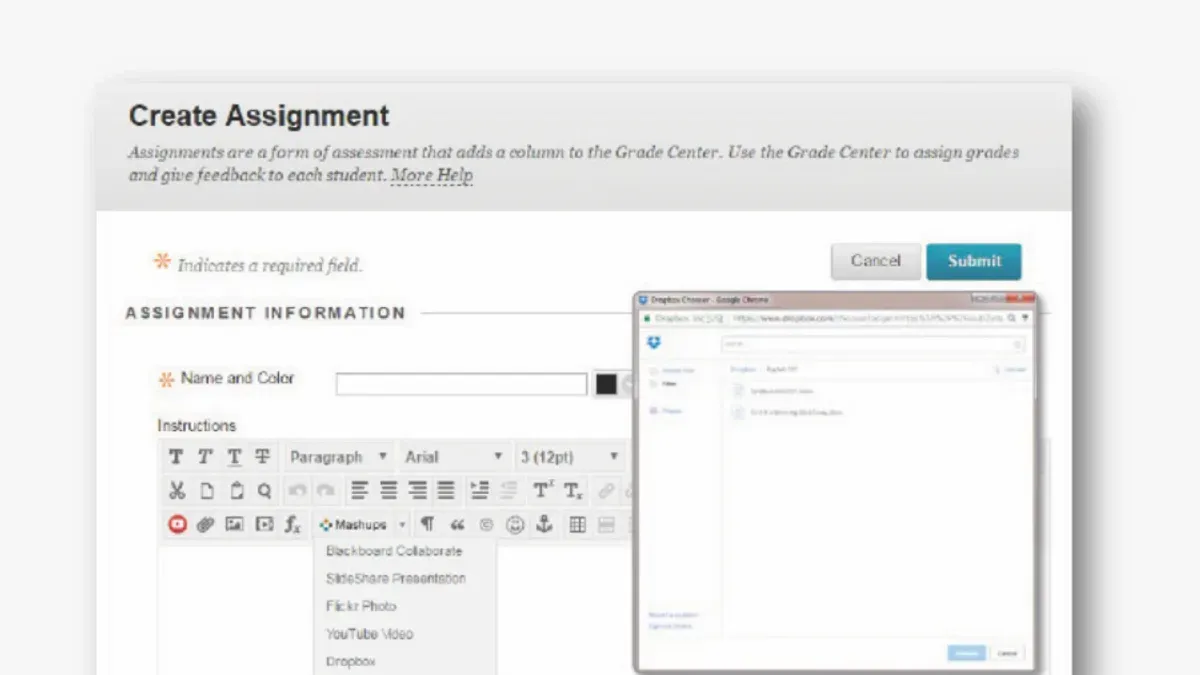
- Enter the assignment name clearly at the top. In the instructions box, provide detailed guidance for students. Attach any relevant files by clicking the Attach File button if needed.
- Set the points possible value to define the assignment’s weight. Specify the due date and optionally set availability dates to control when students can submit.
- Configure submission settings, including allowing multiple attempts if applicable and limiting accepted file types to prevent unsupported formats.
- In the grading options section, attach a rubric if you will use one for assessment. This helps standardize and speed up grading.
- Click Submit to save the assignment. Verify it appears correctly in the course content area with the right name and due date visible.
Follow these steps to create a standard assignment in Blackboard Original quickly and accurately.
How to create assignments in Blackboard Ultra
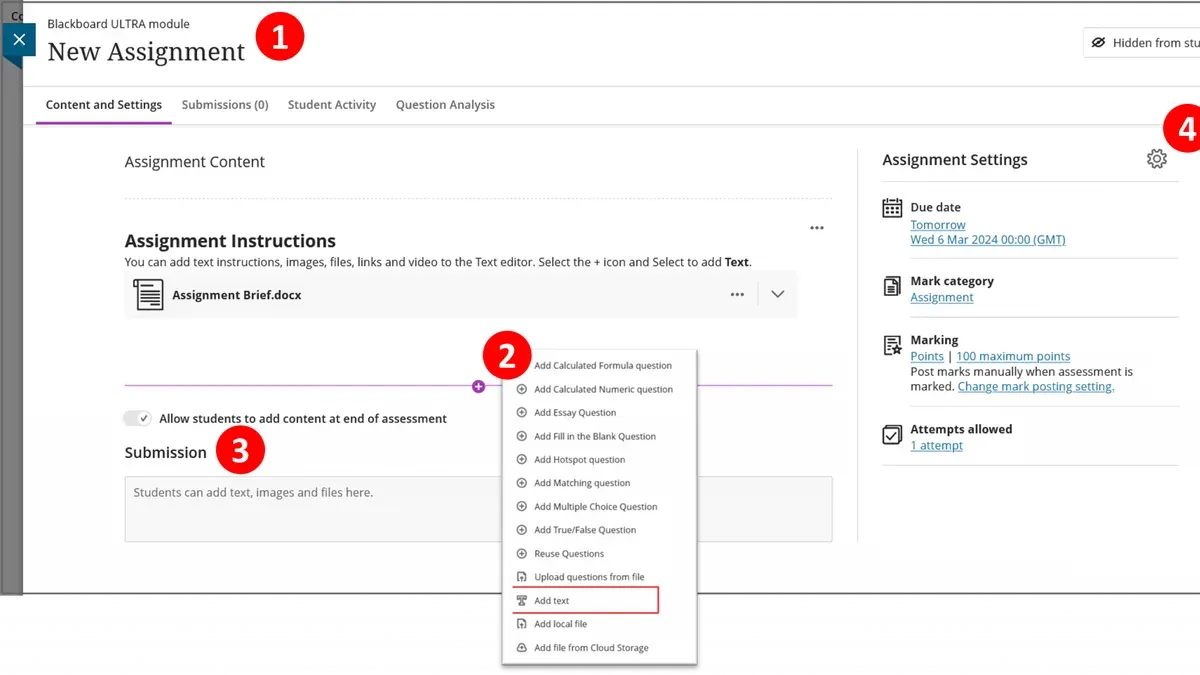
- Access your course and locate the content area where you want the assignment. Click the + button to open the creation menu. You should see options like Create, Upload, and Learn More.
- Select Create, then choose Assignment from the submenu. The assignment creation panel appears on the right side of your screen.
- Enter the assignment title and provide clear instructions. Use the toolbar to add files, links, or multimedia to support the task. The interface is streamlined compared to Original, with a single panel layout.
- Set the due date, points possible, and adjust availability windows under the Settings section. These options appear as intuitive dropdowns and calendars.
- Choose the submission type: file upload, text box, or both. This controls how students submit their work.
- Attach rubrics by selecting the Rubrics option and configure grading settings if required. Ultra integrates these options seamlessly within the assignment panel.
- Publish the assignment using the Post button. Confirm the assignment is visible to students by checking the content area; published assignments show an icon indicating availability.
Compared to Blackboard Original, Ultra uses a single side panel for all assignment settings instead of multiple pages. This reduces clicks and keeps all options visible during creation.
How to find assignments on Blackboard
To locate assignments quickly, start by using the course menu. Look for links labeled Assignments or Course Content, where instructors typically organize tasks. Clicking these links reveals lists or modules containing assignment items.
Use the search bar within your course to find assignments by name or keywords. Enter the assignment title, and relevant results will appear, helping you jump directly to the required submission or grading page.
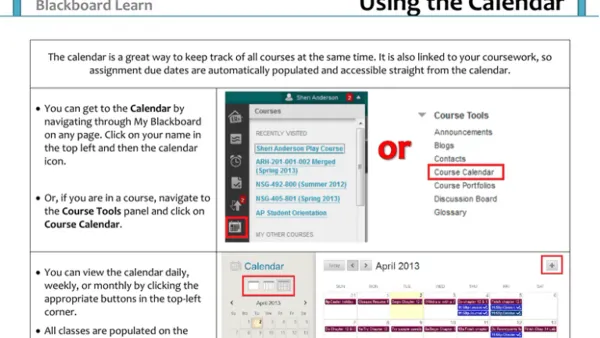
Check the To Do list or course calendar for upcoming assignments and deadlines. These tools provide a consolidated view of pending tasks without navigating through multiple content areas.
As an instructor, access assignments via the Grade Center in Blackboard Original or the Ultra Gradebook in Ultra. These grade management tools list all assignments, allowing direct navigation to submissions and grading options.
To improve assignment discoverability, organize content areas with clear, consistent labels and group assignments together logically. Avoid scattering assignments across multiple folders to reduce search time.
- Open your Blackboard course and locate the course menu on the left side. You should see Assignments or Course Content—click one. This opens a list or module of course materials including assignments.
- Use the course search bar at the top right. Type the assignment name, then press enter. The search results will display matching assignments.
- Click the To Do list or calendar icon in the course navigation bar. Review the upcoming assignments and select any item to open it directly.
- For instructors, navigate to Grade Center (Original) or Ultra Gradebook. Find the assignment listed there and click it to manage submissions.
- Maintain a structured course content area by grouping assignments under clearly named folders, such as "Weekly Assignments" or "Unit 1 Tasks," to simplify future navigation.
How to submit assignments in Blackboard
To submit an assignment, first locate it in the course content area or the Assignments section. Click the assignment title to open the submission interface. Depending on the assignment type, you may upload files, enter text directly, or both.
For file submissions, click the "Browse My Computer" button, select your file, and wait for it to upload. For text entry, use the provided text box to type or paste your work. Review your submission carefully before proceeding.
Once ready, click the "Submit" button. Blackboard will display a confirmation message and provide a submission receipt. Save this receipt or screenshot it as proof of submission.
Be aware of deadlines; Blackboard usually disables submissions after the due date. If late submissions are allowed, they will be marked accordingly. Contact your instructor directly if you encounter issues submitting on time.
Example: Submitting a file and text entry
- Find and open the assignment titled "Research Paper." The submission page appears.
- Click "Browse My Computer," select your "ResearchPaper.docx" file, and wait until it uploads.
- In the text box labeled "Comments to Instructor," enter a brief note about your submission.
- Click "Submit." A confirmation page shows your submission was successful with a receipt number.
How to upload assignments to Blackboard
Uploading files as part of your assignment submission requires attention to file type and size limits. Blackboard supports common formats like DOC, DOCX, PDF, PPT, PPTX, XLS, XLSX, JPG, PNG, and ZIP files, but individual courses may restrict certain types. File size limits vary, typically around 256 MB, so check your course’s specific settings before uploading.
In Blackboard Original, after clicking the assignment link, select Browse My Computer, pick your file, and confirm the upload. You can add multiple files by repeating the process if the assignment allows. In Blackboard Ultra, click Add Content, then Browse Local Files, select your file(s), and confirm. You can drag and drop files as well.
Rename files with clear labels including your name and assignment title, e.g., Smith_ResearchPaper.docx, to help instructors identify your work quickly.
If you encounter upload errors, verify the file size and format. Large files may need compression or splitting. Unsupported formats require conversion to accepted types. Refreshing your browser or switching browsers can resolve occasional glitches.
- Open the assignment link; you should see the submission page.
- Click Browse My Computer (Original) or Add Content then Browse Local Files (Ultra); a file dialog appears.
- Select your file(s); the files should appear listed on the submission page.
- Confirm upload by clicking Submit or Save; you should see a confirmation message.
- If allowed, repeat file selection to add or replace files before final submission.
How to delete an assignment on Blackboard
To delete an assignment, first navigate to its location in your course content area or open the Grade Center where the assignment appears. Use the contextual menu (three dots or arrow next to the assignment name) to find the delete or remove option. Selecting this triggers a confirmation dialog warning you that deletion will remove all student submissions and associated grades permanently.
Confirm deletion only if you are sure, as some institutions do not allow recovery after this action. If your Blackboard setup supports the recycle bin or undo feature, you may restore accidentally deleted assignments within a limited time frame. Always check your institution’s policy on assignment deletion, as some restrict it to preserve grading records.
- Navigate to the course content area or Grade Center and locate the assignment. You should see the assignment listed with options next to it.
- Click the contextual menu (three dots or arrow) beside the assignment name. A menu should appear with several options.
- Select “Delete” or “Remove” from the menu. A confirmation dialog will pop up with a warning about permanent loss of submissions and grades.
- Confirm the deletion by clicking “OK” or “Delete” in the dialog. The assignment will be removed from the course and Grade Center.
- If needed, check if your Blackboard interface has a recycle bin or undo feature to recover the assignment within the allowed time.
How to resubmit an assignment on Blackboard
Resubmitting assignments depends on whether your instructor has enabled multiple attempts. Check the assignment details or contact your instructor to confirm if resubmissions are allowed. If enabled, you can update your submission by uploading new files or editing text responses.
- Locate the assignment from your course content or the To Do list. You should see the assignment status and submission options.
- Open the submission page by clicking the assignment link. This page shows your previous submissions if any.
- Upload new files or edit your text response as needed. The interface will display the updated content before submission.
- Submit the updated assignment by clicking the Submit button. You should receive a confirmation message with a timestamp.
- Verify your submission by reviewing the submission receipt or the assignment status, ensuring it reflects your latest upload.
Previous submissions are typically saved and accessible depending on instructor settings, but often the latest submission overwrites the earlier one for grading. If resubmission is not permitted, Blackboard will disable the submission option or show a message informing you. In that case, contact your instructor for further guidance.
Example: If multiple attempts are allowed, after submitting your first draft, you can return to the assignment link, upload an improved version, and submit again. Each submission will be recorded, but usually only the last one counts for grading.
How to unsubmit a Blackboard assignment
You can unsubmit a Blackboard assignment only if your instructor has enabled this option. This setting allows you to retract your submission to make changes before the deadline. If unsubmission is allowed, the option is visible on the assignment submission page.
- Go to the course and open the assignment you submitted. You should see a button labeled Unsubmit or Retract Submission.
- Click the Unsubmit button. A confirmation prompt will appear asking you to confirm the action.
- Confirm the unsubmission. You will see that your submission status changes, and the assignment is now open for editing or resubmission.
After unsubmission, your previous submission is removed from grading consideration until you resubmit. Deadlines remain in effect, so resubmit before the due date to avoid penalties. If the unsubmit option is not visible, it means your instructor has disabled this feature or the deadline has passed.
If you need to unsubmit but cannot, contact your instructor promptly to request assistance or a manual reset of your submission.
Screenshot tips: Look for the unsubmit button near your submission status; confirmation prompts typically appear as pop-up windows asking you to confirm the retraction.
How to customize Blackboard assignments for your course needs
Blackboard Original and Ultra both offer robust options to tailor assignments to your grading and course design requirements. Adjust availability dates and time limits under the Assignment Settings or Details tabs. For example, in Original, you find these under "Assignment Availability," while Ultra places them prominently under "Due Dates." Use rubrics and grading schemas to ensure consistent evaluation; Original requires attaching rubrics via the Grade Center, whereas Ultra integrates rubric creation directly when setting up the assignment.
Enable anonymous grading in Original from the Grade Center's Grade Anonymously option, and in Ultra through the assignment's Grading Settings. Delegate grading by assigning graders or teaching assistants in Grade Center options (Original) or the Ultra grading panel. Group assignments are supported in both interfaces; select "Group Submission" and specify groups. Adaptive release lets you control assignment visibility based on performance or dates—Original uses Adaptive Release settings, while Ultra uses Conditional Availability.
Balance flexibility with clarity by clearly communicating availability windows and grading criteria. Overly complex adaptive rules can confuse students. Provide straightforward instructions and consistent deadlines. For example, setting a time limit of 120 minutes with a clear due date helps students manage time efficiently. Using rubrics improves transparency in grading and feedback.
- Open the assignment settings in Original or Ultra interface.
- Adjust availability dates and input time limits; you should see updated scheduling options.
- Attach or create a rubric from the grading section; the rubric should appear linked.
- Enable anonymous or delegated grading if desired; confirmation options will reflect the changes.
- Activate group submission and select groups; group details should display on the assignment page.
- Set adaptive release or conditional availability rules; verify the assignment visibility changes accordingly.
Frequently asked questions
How to turn in assignments on blackboard?
To turn in assignments on Blackboard, first log in and navigate to your course. Locate the assignment under the 'Assignments' or 'Course Content' section. Click the assignment title, then use the 'Browse My Computer' or 'Attach File' button to select your file. After uploading, confirm submission by clicking 'Submit'. Always verify the confirmation message to ensure your assignment was successfully turned in.
How to make a blackboard?
If you mean creating a Blackboard course or content area, that requires instructor or admin access. To create a course, the institution typically sets it up via the Blackboard admin panel. Instructors can then add content like assignments by selecting 'Content' > 'Build Content' > 'Assignment' within their course. There is no way to create a standalone 'blackboard' without institutional setup.
How to submit assignments in Blackboard?
Submitting assignments involves navigating to the relevant course and assignment link. Click the assignment title, then choose to upload your file or type directly into the text box, depending on allowed submission types. Click 'Submit' to complete the process. Always check for a submission receipt or confirmation on the screen.
How to upload assignments to Blackboard?
Uploading assignments requires accessing the specific assignment page in your course. Use the 'Browse My Computer' button to select your document, then upload it. Some assignments allow multiple files; check instructions carefully. After uploading, click 'Submit' to finalize your upload.
How to delete an assignment on Blackboard?
To delete an assignment, go to your course's 'Content' or 'Assignments' area and find the assignment. Click the dropdown arrow next to the assignment title and select 'Delete'. Confirm the deletion prompt to remove the assignment permanently. Note that deleting an assignment also removes all student submissions and grades associated with it.
Quick checklist
- Confirm you have instructor or course designer access to your Blackboard course.
- Choose the correct assignment type for your grading needs (e.g., individual, group, graded, ungraded).
- Set clear availability dates and due dates to manage student submissions.
- Use the correct submission types (file upload, text entry, etc.) based on your assignment requirements.
- Double-check assignment settings like grading rubric, feedback options, and anonymous grading if applicable.
- Verify the assignment appears correctly in the course content area for students.
- Test submitting a dummy assignment to ensure everything works before students submit.
What this guide does not cover
This guide does not cover institution-specific Blackboard customizations or integrations with third-party tools like Turnitin or SafeAssign. Some features described may vary or be restricted depending on your institution's Blackboard configuration and permissions. For advanced options like bulk assignment management, detailed grade center analytics, or custom workflows, refer to your institution’s Blackboard support or IT helpdesk.
Focus on these step-by-step instructions to create and manage assignments in the standard Blackboard Original and Ultra interfaces effectively. For any issues beyond basic troubleshooting, your institution’s Blackboard administrator is the best resource.
Start by creating a simple assignment with clear due dates and submission settings. Confirm visibility to students and test the submission process yourself. This foundational step ensures smooth assignment handling throughout your course.
See also: How to Archive Last Year's Classes in Blackboard: A Step-by-Step Guide · How to Add Students to a Class in Blackboard: Step-by-Step Guide