How to Create and Manage Assignments in Brightspace: A Step-by-Step Guide
Step-by-step guide on how to create and manage assignments in Brightspace for instructors and students.

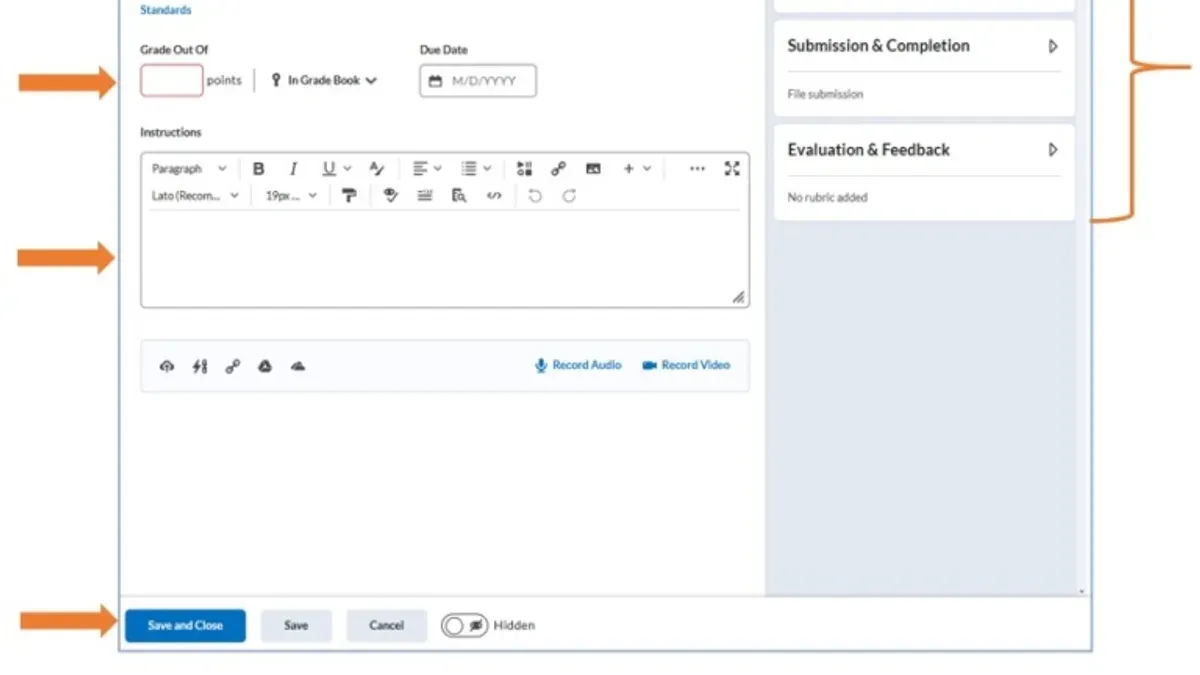
Short answer: To create assignments in Brightspace, you navigate to the course's Assignments tool, select "New Assignment," and configure the details including availability dates, submission types, and grading options. This straightforward process lets you set clear deadlines, attach instructions, and control submission settings to fit your course needs.
This guide covers how to create assignments in Brightspace from both instructor and student perspectives. You will learn how to log in, create and submit assignments, grade them, and manage related tasks such as deleting assignments or handling resubmissions. The article also addresses common issues and troubleshooting tips to keep your workflow smooth and efficient.
Before you start: What you need to create assignments in Brightspace
You must have the correct Brightspace role to create or submit assignments. Instructors need at least “Instructor” or “Teaching Assistant” permissions, while students require the “Student” role. Without these, key features will be unavailable. Confirm you have course access and know your login credentials before proceeding.
Brightspace supports various assignment types: file submission (common formats include.docx,.pdf,.pptx,.xlsx), text submission, and on-paper assignments with digital grade input. Prepare your assignment materials ahead, including clear instructions, grading rubrics, and criteria to streamline setup and evaluation.
Ensure reliable internet connectivity and use a Brightspace-compatible browser such as the latest versions of Chrome, Firefox, Edge, or Safari. Outdated browsers can cause functionality issues, so update or switch if needed.
- Verify your user role and permissions under Course Admin > Manage Users. You should see your role listed; if not, contact your administrator.
- Log into Brightspace with your credentials and confirm you can access the intended course homepage.
- Gather assignment content: instructions, rubrics, and sample files ready to upload or copy.
- Check your internet connection by loading a reliable website and confirm your browser is supported and updated.
How to log in to Brightspace
To access your Brightspace courses, start by navigating to your institution’s specific Brightspace login URL. This is usually provided by your school or can be found on its official website. Enter your username and password exactly as given by your institution; these credentials are case-sensitive and must match the registered account.
If your institution supports Single Sign-On (SSO), you can use this method to log in using your main institutional credentials, often the same ones used for email or other campus systems. After selecting the SSO option, you will be redirected to your institution’s authentication page. Once logged in, Brightspace will open directly without requiring separate credentials.
Common login issues include entering incorrect passwords, leading to account lockouts after multiple failed attempts. If you forget your password, use the password reset link typically found on the login page. If locked out, contact your institution’s IT help desk for assistance. Ensuring your browser accepts cookies and has JavaScript enabled will prevent many access issues.
- Go to your institution’s Brightspace login URL. You should see a login page with fields for username and password.
- Enter your username and password, then click the login button. Successful login directs you to your Brightspace homepage.
- If available, select the Single Sign-On (SSO) option, enter your institutional credentials on the redirected page, and verify access to Brightspace.
- If you get an error, use the password reset link or contact IT support to resolve account issues.
How to create an assignment in Brightspace
- Access your course homepage and select Assignments from the course navigation bar. You should see a list of existing assignments or a blank page if none have been created yet.
- Click the New Assignment button at the top right. This opens the assignment creation interface where you can enter details.
- Enter a clear Title for the assignment and provide detailed Instructions in the text box. Use formatting tools to structure the instructions for clarity.
- Set Availability Dates by choosing the start and end dates under the Availability section. This controls when students can view and submit the assignment.
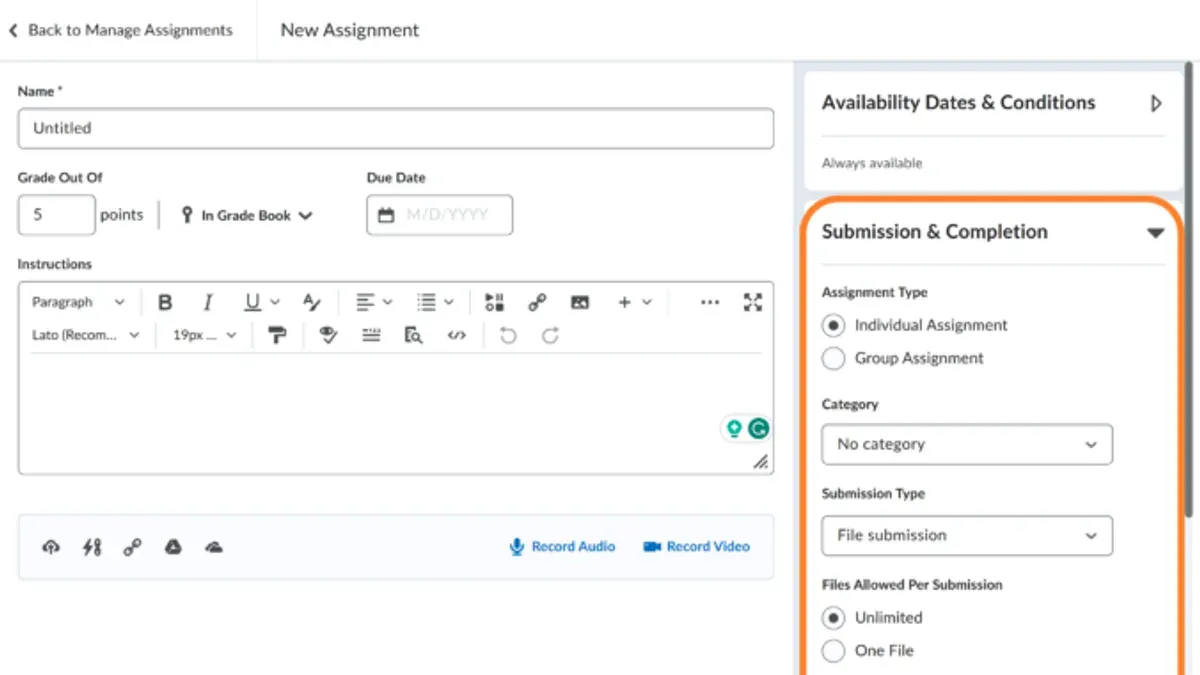
- Choose the Submission Type from options like File Upload, Text Submission, or On Paper. File Upload allows students to submit documents, while Text Submission lets them enter text directly. On Paper disables online submission but enables grading.
- Attach any relevant files or templates by clicking Add Attachment. You can also add a rubric by selecting Add Rubric to align grading criteria.
- Under the Grading tab, select the appropriate Grade Item or create a new one. Assign a grade value and choose a grading category if you use categories to organize grades.
- Review all settings, then click Publish to make the assignment available to students according to the dates you set. If you want to save and finish later, use the Save as Draft option.
Submission types differ: File Upload is standard for document submissions; Text Submission suits short answers typed online; On Paper is for offline submissions but still allows grading in Brightspace. Grading categories help group assignments by type, like "Homework" or "Quizzes," making gradebook management easier.
- Confirm assignment appears in the Assignments list after publishing
- Verify availability dates reflect your intended schedule
- Check attached files and rubric accessibility
- Ensure grading item is correctly linked and graded
How to submit an assignment in Brightspace
Submitting assignments correctly in Brightspace prevents lost work and missed deadlines. Start by logging into Brightspace and navigating to your course’s Assignments section from the course navbar. Locate the specific assignment you want to submit; ensure you select the correct one, especially if multiple assignments are due.
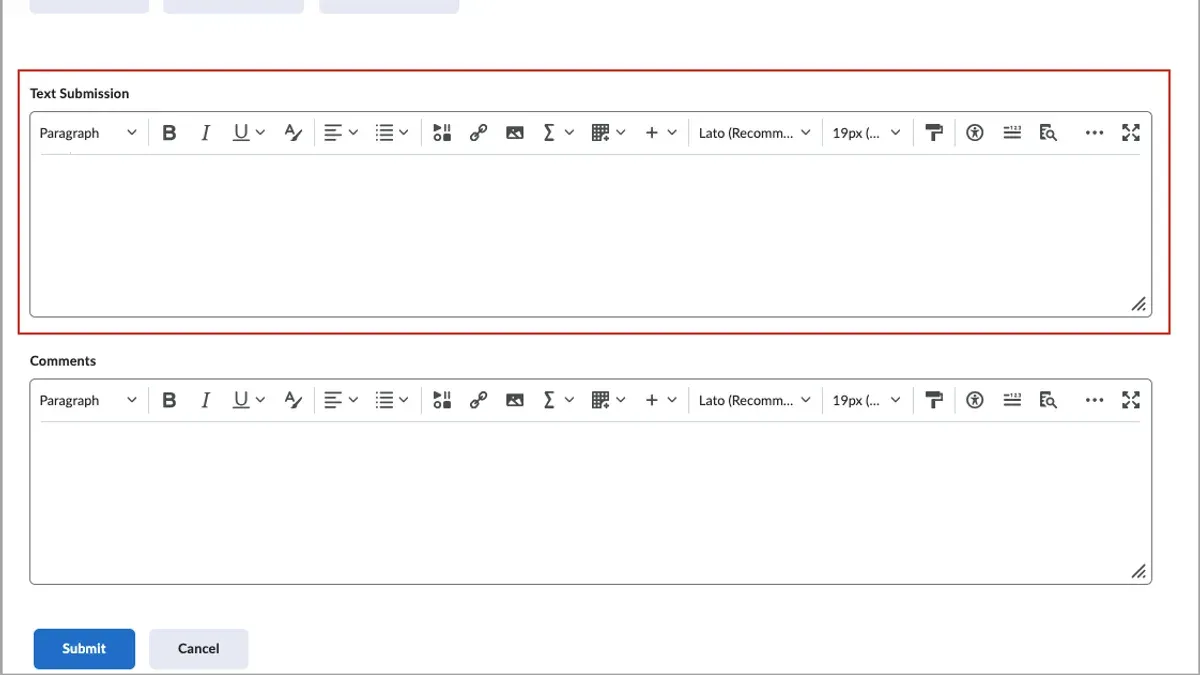
- Click the assignment title to open the submission page. You should see the assignment instructions, due date, and submission options.
- Upload your file(s) by clicking "Add a File" or enter text directly if a text submission box is provided. Confirm your files meet the required formats and size limits.
- Review your submission details, then click "Submit". After submission, a confirmation message appears, usually stating "Submission successful" along with a timestamp.
- Check the submission status on the assignment page to verify your upload. If versioning is allowed, you can resubmit before the deadline; otherwise, your first upload is final.
- Note the deadline and late submission policies displayed on the assignment page to avoid penalties.
For example, after clicking "Submit," you might see a green checkmark with "Your submission was successful on October 5 at 3:45 PM." Keep a screenshot or PDF of this confirmation for your records.
- Log in and open the Assignments section
- Select the correct assignment
- Upload files or enter text submission
- Click "Submit" and confirm submission message
- Check submission status and understand resubmission rules
How to grade assignments in Brightspace
Start grading by opening the assignment from your course homepage. Select the assignment and click the "Grade" button to access all submissions. You will see a list of students, their submission status, and any attached files or inline text.
View each submission directly in Brightspace. For file uploads, click the file name to open it; for text submissions, review content inline. Use annotation tools like highlights, comments, and drawing to give precise feedback on documents. These tools appear on the right side in the grading interface.
Apply grades by entering scores manually in the "Grade" field or link a rubric for consistent evaluation. When using a rubric, select criteria to assign points; the total updates automatically. You can save rubric assessments and adjust grades as needed before returning them.
Return graded assignments by clicking "Publish Feedback," which notifies students. Monitor your grading progress with the status indicators and class statistics available in the gradebook to track completion and average scores. Efficient grading workflows typically enable turnaround within a few days.
- Open your course and navigate to the Assignments tool; select the assignment to grade. You should see the list of student submissions.
- Click a student’s submission to open it; confirm the file or inline text is fully visible on the screen.
- Use the annotation tools on the right to highlight text, add comments, or draw; your annotations appear immediately on the document.
- Enter a numeric grade in the "Grade" box or open the linked rubric, select criteria ratings, and verify the total score updates.
- Save your grading and click "Publish Feedback" to release grades and comments to students; the system will confirm the action.
- Check the grading status column and gradebook statistics to ensure all assignments are graded and returned.
How to delete an assignment in Brightspace
To delete an assignment, first navigate to the Assignments tool in your course navigation menu. Locate the assignment you want to remove and select it. Be aware that deleting an assignment permanently removes all submissions, grades, and feedback associated with that assignment.
Brightspace will display a warning message confirming these consequences before you finalize deletion. Carefully read this prompt to avoid accidental data loss. If you want to keep the assignment data but remove it from student view, consider hiding the assignment instead. Hiding preserves submissions and grades while preventing further student access.
- Go to the Assignments tool; you should see the list of all assignments in the course.
- Select the assignment you want to delete; the assignment details page will open.
- Click the dropdown menu next to the assignment title and choose "Delete"; a warning prompt will appear.
- Read the warning carefully, acknowledging that all submissions and grades will be lost.
- Confirm deletion by clicking "Delete" again; the assignment will be removed from the list.
Below is a comparison to help you decide between deleting and hiding assignments:
| Action | Effect on Submissions and Grades | Student Access | Reversibility |
|---|---|---|---|
| Delete Assignment | All submissions and grades are permanently deleted. | Assignment removed; no access. | Irreversible. |
| Hide Assignment | Submissions and grades retained. | Students cannot see or submit. | Can be reversed by unhiding. |
How to resubmit and unsubmit an assignment on Brightspace
Brightspace allows you to resubmit or unsubmit assignments only if your instructor has enabled these options. Resubmitting means uploading a corrected version after the initial submission. Unsubmitting lets you withdraw your assignment before it is graded, giving you a chance to make changes.
Check your course syllabus or Brightspace assignment instructions to confirm if resubmissions and unsubmission are permitted and whether there is a limit on the number of attempts. For example, some courses allow unlimited resubmissions before the due date, while others restrict it to one or none.
How to resubmit an assignment
- Go to the assignment submission page and locate your submitted file or text. You should see a status like "Submitted" or "Submitted - Needs Revision." This confirms your current submission.
- Click the "Edit Submission" or "Resubmit" button, if available. This option appears only when allowed.
- Upload your new file or edit your text as needed.
- Confirm and submit the updated assignment. The status will update to reflect the new submission date and time.
How to unsubmit an assignment
- Navigate to the assignment and open your submission details.
- If the "Unsubmit" button is visible, click it to withdraw your submission. This option disappears once grading starts.
- Verify that the assignment status changes to "Not Submitted" or similar, indicating you can now make a new submission.
For instance, before resubmitting, your assignment might show "Submitted on Oct 1, 11:59 PM." After resubmission, it updates to "Submitted on Oct 3, 9:15 AM." If you unsubmit, the status resets to "Not Submitted," allowing you to upload again.
Institutional policies often state: "Students may resubmit assignments up to three times before the deadline. Unsubmission is allowed only until grading begins." Confirm these details with your instructor.
How to add students and set up grades in Brightspace
Manage course enrollment by adding students manually or through SIS integration. To add students manually, go to Course Admin > Classlist > Add Participants. Enter student details and confirm; successful addition displays them in the classlist. When using SIS integration, enrollment updates automatically based on institutional records, visible in the classlist.
Verify all students appear in Classlist before proceeding. Missing students indicate enrollment issues that require SIS sync or administrative contact.
Set up grade items by navigating to Grades > Manage Grades > New. Choose the grade item type (e.g., numeric, pass/fail), name it after the assignment, and assign a maximum score. Save to add it to the gradebook.
Link assignments to grade items by editing the assignment’s Assessment tab and selecting the corresponding grade item. This connects submissions to the gradebook for automatic score updates.
Adjust grade settings under Grades > Setup Wizard to configure weighting and categories. Group related assignments for weighted grading schemes or grade categories to organize assessments effectively.
- Access Course Admin > Classlist > Add Participants to add students manually; verify addition in Classlist.
- Confirm enrollment accuracy via SIS integration or contact admin if students are missing.
- Open Grades > Manage Grades > New to create grade items matching assignments; save each item.
- Edit assignment settings under Assessment to link grade items for automatic scoring.
- Use Grades > Setup Wizard to configure weighting and categories for grade calculation.
Troubleshooting common assignment issues in Brightspace
Brightspace users often encounter login errors, submission failures, grading delays, and resubmission restrictions. Login and access errors typically stem from expired sessions or incorrect permissions; logging out fully and clearing browser cache usually resolves this. Submission failures often relate to unsupported file formats or upload timeouts; converting files to accepted formats and using a wired connection helps. Grading visibility issues arise when instructors delay publishing feedback or the system experiences sync lags; refreshing the gradebook or republishing grades ensures visibility. Resubmission restrictions are controlled by assignment settings; verify deadlines and resubmission permissions under Assignment Settings > Submission > Allow Submissions After Due Date. Browser incompatibility and cache problems cause erratic behavior; using browsers like Chrome or Firefox and clearing cache per Brightspace guidelines improves performance.
- Clear your browser cache and cookies, then restart your browser; you should be able to access Brightspace without login errors.
- Check assignment submission settings and file format requirements, convert your file if needed, then upload; the system should accept and confirm your submission.
- Refresh the gradebook and verify if feedback is published; grades and comments should appear to students immediately.
- Confirm resubmission permissions in assignment settings; if allowed, resubmit before the deadline and see confirmation.
- Switch to a recommended browser like Chrome or Firefox, clear caches regularly; Brightspace features should function without glitches or slowdowns.
Frequently asked questions
How to resubmit an assignment on brightspace?
To resubmit an assignment, first check if your instructor has enabled multiple submissions. Go to the assignment submission page, upload the new file, and submit it before the deadline. Brightspace will replace your previous submission with the latest one. Note that some instructors may limit the number of resubmissions or disable this feature.
How to unsubmit an assignment on brightspace?
Unsubmitting an assignment is only possible if your instructor has allowed it. If enabled, you can go to the Submitted Assignments page, select the assignment, and choose the “Unsubmit” option. This removes your submission and lets you upload a new file before the due date. If you do not see the unsubmit option, contact your instructor for assistance.
How to add students to brightspace?
Adding students is typically done by administrators or instructors with proper permissions. Navigate to the Course Admin area, select “Classlist,” then click “Add Participants.” You can add students by entering their email addresses or import a roster via CSV. Always verify that students receive enrollment notifications after being added.
How to set up grades in brightspace?
Go to the Grades tool in your course and create a new grade item or category. Specify grade type (points, percentage, pass/fail), due dates, and weighting if using categories. Link grade items to assignments or assessments to automate score updates. Double-check grade settings for visibility and release options before publishing.
How to use brightspace?
Brightspace organizes course content, assignments, grades, and communication tools in a centralized platform. Log in through your institution’s portal, access your courses from the homepage, and navigate via the course navbar. Use the Content tool for learning materials, Assignments for submission, and Grades to track progress. Familiarize yourself with notifications to stay updated on deadlines and feedback.
Quick checklist
- Confirm you have the correct Brightspace role and permissions to create or submit assignments.
- Log in via your institution’s specific Brightspace URL and verify course enrollment.
- Use the 'Assignments' tool under 'Course Tools' to create or access assignments.
- Follow the assignment creation steps precisely: title, instructions, submission types, due dates, and availability.
- Submit assignments by attaching files or entering text as required before deadlines.
- Grade assignments using the Gradebook or Assignments tool, providing clear feedback.
- Manage assignment lifecycle: delete, resubmit, or unsubmit according to course policies.
- Add students through Classlist and set up grade items aligning with assignments.
- Refer to troubleshooting tips for issues like missing submissions or grading errors.
What this guide does not cover
This guide does not cover institution-specific customizations or integrations with third-party tools that may affect assignment workflows. Some features and permissions described may vary depending on your institution’s Brightspace configuration and role settings. Policies on resubmission and unsubmission are set by course instructors or administrators and may not be overridden by these instructions.
The single most useful next step is to familiarize yourself with your institution’s Brightspace environment, focusing on the exact menu paths and permissions available to you. This ensures you can efficiently navigate assignment creation and management without hitting unexpected blocks or errors.
See also: How to Create a Weekly Agenda Page in Brightspace: A Step-by-Step Guide · How to Build and Manage a Quiz in Brightspace: A Step-by-Step Guide · How to Assign Work to Small Groups in Brightspace: A Step-by-Step Guide