How to Sync Grades with Your Student Information System in Brightspace
This article explains how to configure and use the Grade Sync tool in Brightspace to reliably sync grades with your student information system.

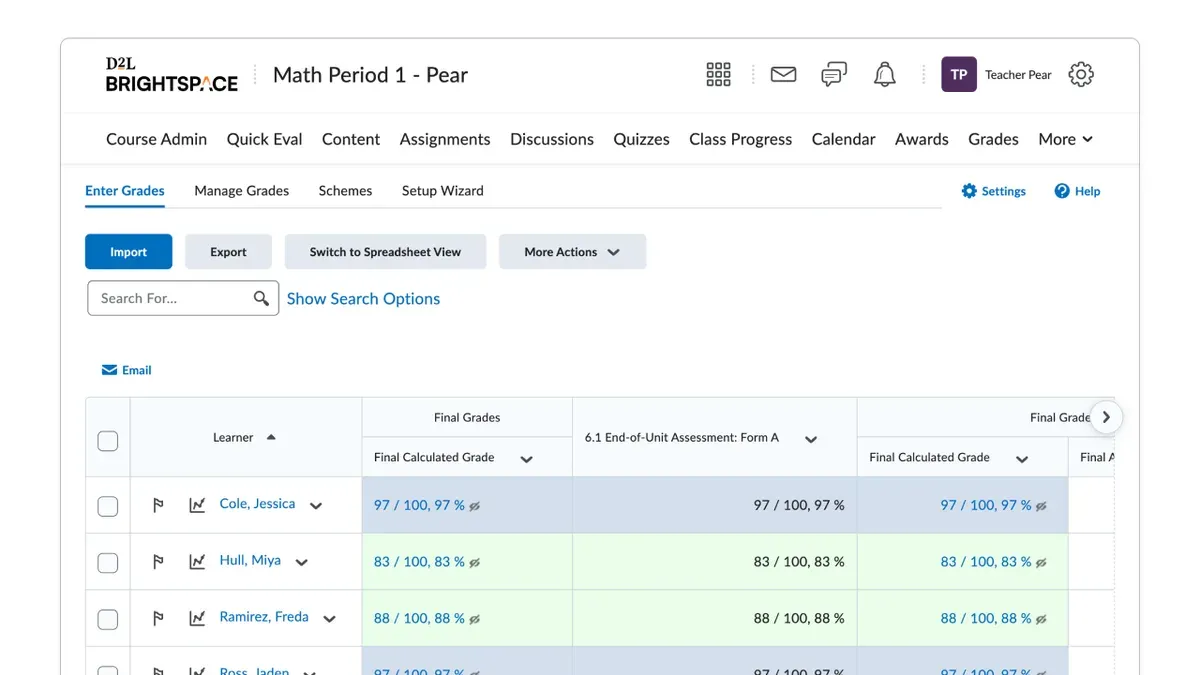
Short answer: To sync grades with the student information system in Brightspace, configure the Grade Sync tool under Course Admin by selecting the correct SIS column, set appropriate grading schemes, and initiate the sync manually or schedule it. Verify settings like the SIS Export Column and ensure the Course Offering ID matches your SIS records to avoid errors.
This article covers the full process for how to sync grades with the student information system in Brightspace. You’ll get clear instructions on configuring the Grade Sync settings, the exact steps to initiate the sync, how to diagnose common failures like mismatched IDs or missing columns, and how to confirm that your grades transferred correctly. Each section focuses on practical, actionable details to help you complete the sync reliably every time.
What Do You Need Before You Start Syncing Grades?
Ensure you have instructor or administrator access in Brightspace with explicit SIS sync permissions. Without these, the grade sync options will be unavailable or restricted. Confirm with your institution’s IT or SIS administrator that your Student Information System supports grade imports from Brightspace and that the integration connection is active and properly configured.
Prepare your Brightspace gradebook by finalizing which grade columns you intend to sync. Only published and correctly configured grade items will transfer. Verify that your grade schemes are compatible with the SIS grading format—numeric values, letter grades, or other scales must match the SIS requirements to avoid data rejection.
Understand your SIS’s expected grade format and mapping rules. Common SIS platforms supported include Banner, PeopleSoft, Colleague, and PowerSchool. Knowing the exact grade field mappings and allowed values helps prevent sync errors and data mismatches.
- Log into Brightspace and confirm your role includes SIS sync permissions; you should see the "SIS Integration" option under your admin settings.
- Check with your SIS admin that the integration is live; a test sync or status report should confirm connectivity.
- Review your Brightspace gradebook, publish the columns for sync, and confirm grade scheme compatibility by comparing with SIS grade formats.
- Obtain SIS grade mapping documentation to understand how grades need to be formatted before syncing.
How Do You Configure the Grade Sync Settings in Brightspace?
- Open the Grades tool from your course navigation and select Manage Grades. You should see a list of all grade items and categories defined in your gradebook.
- Choose the grade items or categories you want to sync by checking their boxes. Verify that the Release to Users option is enabled if you want these grades visible in Brightspace; this setting does not affect SIS sync but helps maintain consistency.
- Locate the SIS Identifier column for each grade item. Enter the exact SIS code or identifier that corresponds to the matching grade item in your institution’s SIS. This ensures correct mapping during the sync.
- Confirm that each grade item uses a grading scheme that matches SIS requirements, such as numeric scales or letter grades. Adjust the grading scheme under the Settings menu if needed to prevent data mismatches.
- Decide whether to schedule automatic syncs or trigger them manually. Use the Grade Sync setup page to set a sync schedule or click Sync Now to run an immediate sync. After running a manual sync, review the output log for confirmation and any error messages.
Example: For a grade item “Midterm Exam,” enter the SIS Identifier as “MIDTERM_2026” if that is the SIS code. Confirm the grading scheme is numeric 0–100 to match SIS expectations. Then manually sync and check the success message and detailed log for accuracy.
Following these steps ensures the sync aligns precisely with SIS data fields and grading formats, minimizing failures and data errors.
What Is the Step-by-Step Process to Initiate the Grade Sync?
- Log in to Brightspace and navigate to the Admin Tools menu, then select SIS Sync. You should see the list of available sync profiles.
- Choose the appropriate sync profile configured for your course or create a new one by clicking New Sync Profile. Assign a clear name and link it to the correct SIS integration and grade items.
- Verify the student roster alignment by clicking View Roster within the profile. Confirm that all enrolled students in Brightspace match the SIS roster; discrepancies must be resolved before syncing.
- Start the sync by clicking the Run Sync button. A progress indicator and live log messages will appear, showing the number of grades processed and any errors encountered.
- Once the sync completes, open the SIS gradebook to confirm that all grade items have transferred correctly. Compare several student grades between Brightspace and SIS to ensure accuracy.
For example, when syncing a midterm grade, the log showed 100 grades processed with zero errors. The SIS gradebook reflected all corresponding scores exactly as in Brightspace. This direct comparison confirms a successful transfer.
How Do You Troubleshoot Common Grade Sync Failures?
Grade sync failures often stem from mismatches in student IDs or SIS Identifiers. Check that each student’s Brightspace ID exactly matches the SIS record. An error like "SIS Identifier mismatch for student ID 12345" indicates a misaligned or missing identifier. Correct the IDs in Brightspace or update the SIS roster accordingly.
Grade item mapping errors occur when SIS does not recognize Brightspace grade columns. If you see "Grade item 'Midterm Exam' not found in SIS schema", verify that the grade item’s SIS Identifier matches the expected SIS field. Adjust the mapping in the Brightspace grade sync settings to fix this.
Permission errors such as "User lacks permission to initiate sync" prevent the process from starting. Confirm you have the required SIS sync permissions under Admin Tools > Roles & Permissions. Request additional permissions if needed.
Partial syncs can leave data inconsistent. When a sync only transfers some grades, rerun the sync after resolving errors or use the rollback option in the sync interface to revert partial changes before retrying.
Consult sync logs via Grades > Sync Logs for detailed error codes and messages. A typical corrected log entry looks like: "Sync completed: 100 records processed, 0 errors". Use these logs to pinpoint and address issues efficiently.
- Review the sync log for error messages. You should see detailed descriptions of what failed.
- Match student IDs and SIS Identifiers exactly. When fixed, error messages regarding mismatches disappear.
- Verify grade item SIS Identifiers align with SIS schema. Correct mapping results in no grade item errors.
- Check your permissions under Admin Tools > Roles & Permissions. Having the right permissions enables sync initiation.
- If the sync is partial, use the rollback function, then rerun the sync. A successful run shows zero errors in the log.
How Can You Verify and Validate Your Grade Sync Results?
Start by reviewing the Grade Sync Audit Logs in Brightspace under Grades > Sync Reports > Audit Logs. Confirm that the sync completed without errors and note timestamps for reference. These logs provide detailed records of each sync attempt, including any warnings or failures.
Next, cross-check grades directly in your Student Information System. Look for completeness by matching the total number of grade entries and verify accuracy by sampling student grades against Brightspace gradebook values. Pay attention to grade formats to ensure proper conversion.
Perform spot checks on a set of student records and grade item totals. Select a random sample of 5-10 students and compare their grades across systems. Also, verify aggregated grade totals for key assignments to catch discrepancies.
Set up automated notification alerts for future sync errors via Brightspace’s notification settings at Admin Tools > Notifications > Sync Errors. This ensures prompt awareness of issues requiring immediate action.
Finally, document each sync process with date, time, sync profile used, and outcomes including screenshots of audit logs and SIS grade views. Maintain this documentation in a shared institutional folder for compliance and troubleshooting reference.
- Access Grades > Sync Reports > Audit Logs in Brightspace; verify the sync status shows "Completed" without errors.
- Open your SIS grade module and confirm the number of grades matches Brightspace; spot-check individual student grades for accuracy.
- Randomly select 5-10 students and compare their grades item-by-item between Brightspace and SIS; totals should align.
- Configure Brightspace notifications at Admin Tools > Notifications > Sync Errors to receive alerts on future sync failures.
- Record your verification steps and results with date, sync profile, and screenshots; store them in your institutional records.
- Check audit logs for sync completion and errors
- Cross-verify grades and totals in SIS
- Spot-check student grades for accuracy
- Enable notification alerts for sync issues
- Document all sync verification activities
What Are Best Practices to Maintain Continuous Grade Sync Accuracy?
Maintain ongoing sync accuracy by regularly updating SIS Identifiers and verifying student enrollments to reflect roster changes. Keep your Brightspace gradebook organized using clear, consistent naming conventions for grade items; ambiguous or duplicate names often cause sync confusion. After any major course update or system upgrade, schedule test syncs to catch potential issues before full grade transfers. Train instructors on proper gradebook maintenance, emphasizing the impact of accurate grade item setup and timely grade entry on sync reliability. Coordinate closely with SIS administrators to stay informed on integration updates or changes that might affect data transfer.

A school implemented these practices and saw a significant reduction in sync errors by proactively addressing identifier mismatches and improving gradebook clarity. Regular communication between instructors and SIS staff also minimized unexpected sync failures.
- Update SIS Identifiers and verify active enrollments in Brightspace; successful syncs reflect current student lists with no missing IDs.
- Audit and rename grade items for clarity, avoiding duplicates; the gradebook should show unique, descriptive item names.
- Perform a test sync after course or system changes; review logs confirming no errors before full sync.
- Conduct instructor training sessions on gradebook best practices; instructors demonstrate consistent accurate data entry.
- Coordinate monthly with SIS admins to review integration status; confirm any SIS updates are compatible with Brightspace sync.
Frequently asked questions
How often should I sync grades between Brightspace and the SIS?
Sync grades as frequently as your institution’s policies require, typically after significant grading milestones like assignment completion or grading periods. Daily or weekly syncs are common to keep the SIS up to date without overwhelming the system. Avoid syncing too often to prevent performance issues or accidental overwrites.
What permissions do I need to sync grades in Brightspace?
You need the "Manage Grades" and "Export Grades" permissions within Brightspace. These are usually assigned to instructors or administrators under course roles. Confirm your account has access to the "Grade Sync" tool in the course administration menu.
Why do some grades not appear in the SIS after syncing?
Missing grades often result from incorrect mapping between Brightspace grade items and SIS grade columns. Check that the grade items are marked as "Included in Final Grade" and mapped correctly in the SIS export profile. Also, ensure grades are published and not in draft status before syncing.
Can I sync grades for multiple courses at the same time?
Brightspace generally requires syncing grades on a per-course basis to ensure accuracy and control. Some institutions may have batch processing options via custom SIS integrations, but standard Brightspace functionality focuses on individual course syncs. Always verify each course’s settings before initiating sync.
What this advice does not cover
This article does not cover initial SIS integration setup or authentication configurations, which require coordination with IT administrators. If you need to establish the connection between Brightspace and your SIS or manage user credentials for the sync, contact your institution’s IT department. This guide focuses exclusively on grade data syncing once the integration is in place.
Quick checklist
- Confirm SIS integration and authentication are configured with IT.
- Verify grade item settings in Brightspace match SIS requirements exactly.
- Set the correct export format and mapping in Brightspace’s Grade Sync settings.
- Initiate the sync from the Grades tool, monitoring the export log for errors.
- Review error messages carefully to identify missing mappings or data conflicts.
- Check the SIS to confirm grades have been received and recorded accurately.
- Schedule regular syncs and monitor logs to catch issues early.
Start by verifying your grade item mappings and export settings in Brightspace. Getting these correct upfront reduces sync failures and saves troubleshooting time. Once you confirm these configurations, initiate a test sync and review the export logs immediately to catch any errors before the official grade submission deadline.
See also: How to Grade Student Work in Brightspace: A Clear Step-by-Step Guide · How to Create and Manage Assignments in Brightspace: A Step-by-Step Guide · How to Set Up Rubrics in Brightspace: A Clear Step-by-Step Guide · How to Leave Clear, Effective Feedback on Student Work in Brightspace